B460M-A PRO (MS-7C88) Motherboard - Windows 11 Compatible?

gammonfb160156602dd

New member
Joined
Nov 1, 2024
Messages
11
I am trying to upgrade this system board (currently in my desktop) from MS Windows 10 PRO to Windows 11 PRO. When I check the Windows 11 requirements, I get the following two requirements that are needed.
- This PC must support Secure Boot
- TPM 2.0 must be supported and enabled on this PC

My question is does this system board support Windows 11 and if so do you have instructions on how to change these two requirements.
If you need more information, just let me know.

Thank you for your help.

Danny Gammon
 
Yes. Update the BIOS to the latest version and you're good. Update how-to:

1) Get the latest BIOS. It's the topmost one on the MSI support page for your board. https://www.msi.com/Motherboard/B460M-A-PRO/support
2) Extract the file and you will get a text file and the BIOS file. Put the BIOS file into the root folder of a USB stick/drive.
3) Enter the BIOS by pressing DEL during boot, go to "M-FLASH" in the BIOS.
4) Once M-Flash (the updater) is loaded, it will show a list of your drives. Select the USB stick and select the previously extracted BIOS file on there.
5) It will ask for confirmation and then update the BIOS. It's fully automatic from there, takes about two minutes.

Remember to enable XMP and set your fan curves afterwards. You can also look at the Guide: How to set good power limits in the BIOS and reduce the CPU power draw.
 
Ok be patient with me but I want to make sure that I have this right. I am currently on Windows 10-Pro. I currently have the B460M-A PRO (MS-7C88) motherboard with an Intel processor. I can select the most current BIOS from the MSI.com support sight, update the bios, and then I will be able to upgrade to Window 11-PRO without getting the "This PC must support Secure Boot" and the "TPM 2.0 must be supported and enabled on this PC" messages? I guess this is the bottom line to my original post.

Thanks.
Danny

Yes. Update the BIOS to the latest version and you're good. Update how-to:

1) Get the latest BIOS. It's the topmost one on the MSI support page for your board. https://www.msi.com/Motherboard/B460M-A-PRO/support
2) Extract the file and you will get a text file and the BIOS file. Put the BIOS file into the root folder of a USB stick/drive.
3) Enter the BIOS by pressing DEL during boot, go to "M-FLASH" in the BIOS.
4) Once M-Flash (the updater) is loaded, it will show a list of your drives. Select the USB stick and select the previously extracted BIOS file on there.
5) It will ask for confirmation and then update the BIOS. It's fully automatic from there, takes about two minutes.

Remember to enable XMP and set your fan curves afterwards. You can also look at the Guide: How to set good power limits in the BIOS and reduce the CPU power draw.
 
Yes, install the latest one and you should be OK to install Win 11. Secure Boot should be on by default, you will just have to make sure TPM is set.
 
I appreciate all of the help. Have successfully downloaded and installed the latest MSI BIOS. I then ran the PC Health app again to check Windows 11 compatibility. The BIOS upgrade fixed my TPM 2.0 support issue. However, the "This PC must support Secure Boot" issue is still displaying. I went back into the BIOS to checked the advanced BIOS, security settings and it looks like Secure Boot setting is enabled. Thoughts or ideas on how I can get this PC capable of updating to Windows 11? Any help would be appreciated. I am just trying to keep from having to get a new computer/motherboard. Thanks again. Danny
 
Can you show a screenshot of the Secure Boot page in the BIOS? What's your CPU and GPU? Don't worry though, with this board, it's guaranteed to be compatible overall, it's just a matter of one or two settings. Also i want to see if you use the iGPU, or a GPU, and how old the GPU is.
 
The CPU is:
1730828853443.png

The Display card is:
1730829255721.png

I did not see the GPU or iGPU settings on the BIOS Security screen. I also did not know how to print a screen while in the BIOS. I probably am looking in the wrong place.

Sorry. Danny
 
Ok. You need to take out the graphics card, it's way too old. This is a card from 2007, it does not have the properly equipped firmware to work with a BIOS in pure UEFI mode with Secure Boot enabled. Also, with a tiny 512MB DDR2 RAM on the graphics card, it's basically just wasting energy for nothing, the integrated GPU of that i3-10100 is probably faster. And of course, for any office work and watching stuff on Youtube etc., the iGPU is superior, the iGPU has much better support for modern video decoding.

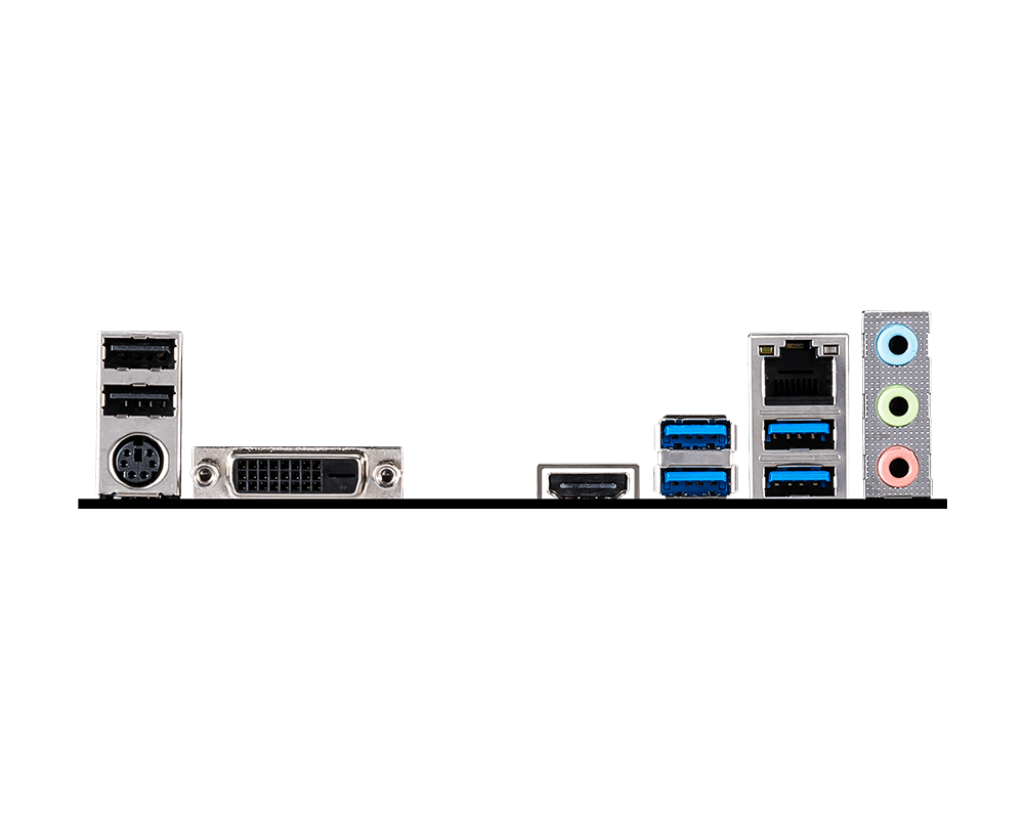
So, turn off the PC, remove mains power. Take out the graphics card. It will be in the slot i highlighted here, on the left it's held with a screw, and then you have to press on that plastic tab/lever to release it on the right side and pull it out.

Unbenannt.png


Afterwards, you can connect an HDMI or DVI cable directly to the appropriate output on the board, second or third from the left:

1024.png

Latest Intel graphics drivers (you need the third one down, "(For 10th Gen and older)"): https://www.techpowerup.com/download/intel-graphics-drivers/
 
So let me say this back to you.
- Remove the NVIDIA graphics card
- Connect my monitors to the appropriate connectors on the MSI mother board
- Install the more current Intel Graphics Drivers (10th Gen and older)
- Then the Secure Boot Enabled option should work properly for the Windows 11 compatibility check?

If I have this right, I will get started on these things shortly.

Thanks.

Danny
 
Ok. I removed the power from my PC then removed my
1730931224388.png
graphics card. I moved my HDMI and DVI connections from the NVIDIA card to the corresponding ports on the MSI mother board. This is where I show my BIOS short comings. When I powered up the PC, the computer went straight to the MSI BIOS setup screen instead booting to my Windows 10. When I exited the BIOS setup screen without changing anything it would reboot and then go right back to the BIOS screen. Granted the MSI BIOS screen displayed on both of my monitors but I didn't what to change to get it to go to Windows instead of to the BIOS setup screen. Does this mean that I need to buy another more current graphic card that will support Windows 11 and a DVI and a HDMI monitor? If so what would be a good NVIDIA "entry level" board to use with Windows 11? I know I am testing your patience but any help would greatly appreciated. Danny
 
Ok. With the Intel iGPU, it is now using pure UEFI mode with Secure Boot, most likely. Now you have the issue that your current Windows 10 installation is not prepared for this. Most likely, if you look at the motherboard, on the very top right corner, it will show the EZ Debug LED "BOOT".

This means you probably have to do a quick MBR to GPT conversion for the Windows boot drive, then the BIOS in UEFI mode can boot from it again. It takes just a couple minutes to get this going again. You can also google for other guides that you understand better, if the above sounds too complicated. There's several ways to do this conversion. You could even temporarily put in that old GeForce again and then do the conversion from your running Win10.

Another option, of course you could install Win11 now, if you have an USB drive that's prepared with the Win11 installer according point 3) here (using the latest Media Creation Tool). It would most likely install no problem like this. But it won't upgrade your existing Windows if you boot from the Win11 installation media. For that, you'd have to run it from a running Win10. Then it will offer to upgrade and keep your programs and settings. So it's better to do the conversion.

I know this is a bit difficult, but for Win11 you have to jump through hoops sometimes...
 
Well at least I am making progress. I am going to digest the information that you sent me a little more. If I understood your explanation, I can do the MBR to GPT conversion while running my old NVIDIA graphic card on Windows 10. Then I should be able to remove the old NVIDIA card, move the cables, to the MSI system board, verify the BIOS information and the Secure Boot message on the PC Health run should show that it is ready to convert to Windows 11. Then I should be able to operate like this until I am ready to actually convert to Windows 11. If everything completes successfully there should not be any lose of data or applications. Your guidance has been very helpful. I think that I can do this. Danny.
 
OK. I now have a new problem with my B460M-A PRO (MS7C88) Motherboard that now overshadows my Windows compatibility issue. It looks like I had a brown out situation last week that got through my UPS device and has damaged my motherboard. Now I am faced with three options.
1. Determine if this model motherboard (B460M-A PRO (MS7C88)) is still available so that I can get another one just like it and utilize all of my current components.
2. Determine if there is a replacement model motherboard that I can use instead of the MS7C88 and still utilize my same CPU, memory, etc.
3. Bite the bullet and just get a new desktop that is already Windows 11 compatible then reinstall all of my applications/restore all of my data.

I would greatly appreciate thoughts/ideas on which option might be the best one going forward as well as which one might be the most cost effective in the long run.

Not what I was expecting just before Thanksgiving but a bump that I have to go over.'

Again, any help would be greatly appreciated.

Danny Gammon
 
You can get any boards for socket LGA1200, including the later 500-series boards, which are still available here (at least some models). It doesn't even have to be an MSI board, let alone the same board you have now. From MSI, the only µATX-sized board with good availability still would be the MSI PRO H510M-B, costs around 60 EUR here. The problem there is, it only has an HDMI and a VGA (!) output, not DVI. This is not ideal for using two monitors, unless you're ok with the secondary using getting an analog VGA signal, which might not look as sharp. The alternative to that would be something like the ASUS Prime H510M-A R2.0, with HDMI, DisplayPort and VGA. For the DP output, if none of your monitors has a DP input, you can get a DP-to-HDMI cable.

Once you have installed all your stuff in the new board properly (minus the graphics card of course), you should still update the BIOS, first thing, also see here (and check the video i link there for how to install things). Then you try to boot Windows. Remember, it might still need that conversion done which i mentioned, before it can boot.

If you are ok with the performance you have now, then this is by far the cheapest way to make everything work again and still have all your data and settings present.

About the power surge, brownout, or whatever happened there, normally the PSU should prevent the worst. If it got through to the board, something went wrong, or you just had a bad PSU. Are you sure it's just the board that's damaged, and what makes you think so? I'd expect the PSU to take the hit for the most part. Can you look up which PSU you got?
 
I am checking on the availability of the MSI PRO H510M-B. Like you said, it looks like it will be easy to get. Just a curiosity question. Once I get the new MSI board installed, the CPU moved, the memory moved, and all my peripherals connected, will the Windows 10 Pro that is on my current SSD hard drive recognized the new system board and actually boot the system?

As for the brown out, the PSU was my first thought so I replaced it with a new one. There was still no power when I turned it on. I took it to a local PC shop to give me a diagnosis. They tested the PSU and other devices. They said everything else was working properly and that the system board was the problem. I have to depend on their diagnosis since that is beyond my pay grade... LOL.

Again thanks of all of the help that has been shared with me. It is greatly appreciated.

Danny
 
Once I get the new MSI board installed, the CPU moved, the memory moved, and all my peripherals connected, will the Windows 10 Pro that is on my current SSD hard drive recognized the new system board and actually boot the system?

Any recent BIOS will default to the so-called UEFI mode, and that is 100% correct nowadays. Since your Windows was apparently installed with the old BIOS in CSM/Legacy mode, it will not boot Windows at first, you'd only get it booting to BIOS again, unless you do that conversion for the boot drive i mentioned before. This is further explained here. It is absolutely vital to do this conversion, you cannot skip it, because Windows 11 has UEFI mode for the BIOS as a hard requirement. You can also see here for the alternative of a clean install of Win11. But i take it you want to get your Win10 working and then upgrade to Win11. Then you need to do that MBR to GPT conversion. Try to find some guides on it, it's doable.

Another thing though. Since your board apparently was damaged, once you replaced the board, Windows will treat it like a new system as far as the activation. Meaning, once you managed to boot Windows after doing the conversion, it will require another activation. What you can do is, you could upgrade to Win11, then run the activation troubleshooter in the settings there. Worst comes to worst, you can call the MS hotline which will be listed there somewhere, explain the situation, and they should give you directions on how to activate it again at no extra cost. Don't buy another full Windows license. The Win10 license works for Win11 too. There's ways to get this activated properly again for free.

BTW, what was your old PSU model and what's your new one?

Always glad to help, of course.
 
I replaced the old PSU with another one that was the same model. So they are both EVGA 400W PSUs.

So to make sure I understand. If I replace the damaged motherboard with a new one, move over the CPU and Ram, and connect my SSD drive, then the computer should boot to my Windows 10 operating system. Then I will be asked for my Windows 10 key (which I have). I should download the latest BIOS for the motherboard. Then I should be able to run the conversion of my disk drive from MBR to GPT. Once I get all of this accomplished then I should be able to upgrade from Windows 10 to Windows 11.

Do I understand this correctly or have I missed a step.

Danny
 
Back
Top