- Joined
- Jan 25, 2007
- Messages
- 40,488
The MSI Afterburner is a great tool for monitoring your vga's health status as well as overclocking it including tweaking voltages.
Monitoring
If you are having problems with Afterburner please see this Site
MSI AfterBurner Problems
In case you came her with a vga related problems you might be asked to tell about the load and idle temps of your vga.
So first we focus on how to monitor temps.
First we start Afterburner and see this.
[attachthumb=1]
Just for monitoring we don't need the sliders visible as these are for tweaking/oc and we take care of that later. To the right there is a window with different graphs of all kinds of temps and voltages. There you can montiore the idle status but that won't really help you to see what happens in a game. You will only know about your temps under load in the moment your gaming and not when already leaving the game. At least the graphs will show the temps as a graph so you can read up temps of past times also but it is quite complicated to find the temp spike of the right time and read up the value.
It's easier to have the temps and voltages displayed in the game with an OSD (note: OSD doesn't work in 64bit applications). To get that work you need to activate it.
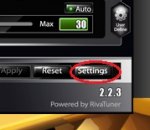
First click on "Settings"
[attachthumb=2]
Now go to "monitoring" in the Settings menu
[attachthumb=3]
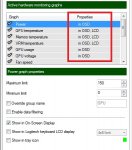
In "Active hardware monitoring graphs" you can choose what should be displayed in OSD.
[attachthumb=4]
On the left you have the possible graphs to be selected. When you click on a graph you activate it and the symbol next to it lights up. Now you have to choose the properties of that graph. That is done by clicking on "Show in On-Screen Display" or "Show in Logitech keyboard LCD Display" or "Show in tray icon". Choosing "Show in On-Screen Display" means the graph will be shown in the game while LCD means it will be shown on a supported LCD of a Logitech Keyboard (e.g. G510). These both options are therefor ideal to checkout load temps and voltages.
Please note that there is also a graph for Famerate to be activated to even monitor FPS in games
After setting the graphs you want to be displayed just click on "ok" and you are done. NOTE: Only graphs of sensors that can be read out can be selected. Some cards won't be able to support gpu voltage monitoring hence that graph can't be selected.
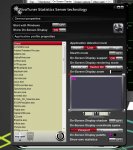
If needed you can also add hotkeys for the OSD in On-Screen Display. By clicking on "More" you have the ability to mod the look and layout of the OSD as well as setting up profiles.
[attachthumb=5] [attachthumb=6]
Now after starting a game you can see the graphs selected displayed inside your game so you can see what happens while you are gaming and you can also find out how your vga's status will change in any game situation
[attachthumb=7]
Fan control
After monitoring temps you might have seen too high temps and want to lower them or you want more cooling in oc attempts. Also could be you saw low temps but your card is very noisy because of high fan speeds. All that could make it necessary to change the fan speed manually instead of auto control
[attachthumb=8]
After deactivating auto control by clicking on "Auto" you can move the slider between Min and Max to select the fan speed in %. Setting 68 therefor means fan will be running at 68% of it's full speed. After selecting click on "Apply" to apply the chosen fan speed.
Besides a static speed you can also program a custom fan profile with clicking on "Fan" in "Settings" afterwards just deactivate auto control and activate "User Define"
[attachthumb=9]
Checking stability with Kombustor
Along with Afterburner the downloaded archive also contains Kombustor. Kombustor is a burn-in vga tool like Furmark which will apply very massive load to your vga and will reveal thermal and stability problems when letting it run for some time.
After installing you can start it out of Afterburner by clicking on the "K" to left
[attachthumb=10] [attachthumb=11]
Overclocking and Overvolting
With the Core Clock and Memory Clock sliders you can tweak the clockrates of the Gpu and the VRAM. The Mhz value selected adds or reduces the stock clockrates. That means e.g. setting +65 for Gpu will add 65Mhz to the stock clockrate. Setting -50Mhz will reduce the stock clockrate by 50Mhz. To apply your oc remember to always click on "Apply"
[attachthumb=12]
Overvolting with the overvolting slider will work the same way what means what you set will be added to the stock voltage. Note that overvolting gpu on Kepler (GTX600) is limited on non unlocked cards (Lightning/Hawk) to the nvidia max of 1.175v and setting anything else will therefor be useless.
[attachthumb=13]
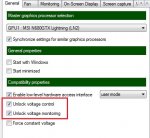
If overvolting is greyed out and can't be changed you have to activate it in "Settings"/"General". [attachthumb=14]
Simply check "Unlock voltage control" and "Unlock voltage monitoring"
NOTE: Despite mistakable informations on the web the only MSI Radeon 7850/7770 cards able to overvolt are R7850 Power Edition 2GD5/(OC) and R7770 Power Edition 1GD5/(OC). Due to technical restrictions all other 7850/7770 models can't be overvolted therefor overvoltage slider won't be available.
Triple overvolting will only be available with Lightning, Hawk or Power Edition cards and is a unique MSI feature that won't work with any other manufacturers card.
On supported cards you can access it (after enabling overvoltage, see above) when clicking on the grey symbol next to the voltage slider
[attachthumb=15] the voltage slider will then change to triple overvoltage (core/mem/aux) [attachthumb=16]
Note that triple overvoltage for Lightning and Power Edition GTX680 & GTX670 vgas will require Afterburner version 2.2.3, the latest GTX 660 & 650 cards will require Afterburner 2.2.4 or above. GTX680/770/780 Lightning users must use an unlocked Afterburner version for full triple overvoltage abilities (Nvidia gpu voltage limit). Until Version 3.0.0 Beta 17 a special SE variant was required. With 3.0.0 Beta 18 the SE version has been merged to the normal version. To unlock the advanced voltage settings simply go to "General" tab of the settings, check "unlock Voltage control and choose "extended MSI"
[attachthumb=17]
Power Limit
[attachthumb=18]
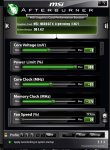
The Power Limit slider is only accessible on GTX600 or above cards as it is required to modify the unique GPU boost feature. GPU boost is nvidia's auto oc feature for Kepler cards and will increase clockrate when not reaching the pre-defined TDP value under load. With the Power limit slider you can change the TDP limit in %. Anything over 100% will extend the limit and enable the gpu to boost clockrate while already at 100% TDP.
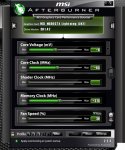
If the Power limit is not visible although you are using a GTX600 vga you chose the wrong afterburner skin in "Settings"/"User Interface" The Power Limit slider will only be visible with "Default MSI Afterburner Skin"
[attachthumb=19] ----> [attachthumb=20]--->[attachthumb=21]
Temp Limit
With the new GeForce GTX7xx / Titan series vgas came an enhanced version of the boost introduced with GTX6xx vgas. Boost 2.0 adds a Temp Limit to the previous Power Limit. So now the available boost is not only determined by the Power Limit but also by the set Temp limit. To change the Temp limit you need a supporting version of Afterburner (3.00 Beta 10 and above). Click on the down arrow next to the Power limit slider and Temp Limit becomes available.
[attachthumb=23] ---> [attachthumb=22]
By default Temp limit is set to a target temp of 79?C what means anything below will allow max boost. Increasing Temp limit will allow boosting at higher temps. In standard configuration Power and Temp limit are linked what means increasing Power Limit will also increase Temp limit. If you want to change that and set individually uncheck "Link". Clicking on "Prioritize" you can decide if Temp or TDP Limit should be the primary factor to determine boost.
Gaming APP
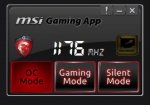
Another thing which needs to be kept in mind is that maximum clockrates for the latest GeForce GTX7xx Gaming requires running >>Gaming APP<<. Switch to Gaming Mode (N770 TF 2GD5/OC (GeForce GTX 770 GAMING)) or OC Mode (N780 TF 3GD5/OC (GeForce GTX 780 GAMING)) to allow maximum boost clockrates.
[attachthumb=25]
Oc Profiles and starting up with oc
[attachthumb=24]
After tweaking clockrates, voltages and power limit you can setup five profiles with these values. Just click on a profile number followed by clicking save. Now you can change between your profiles by choosing the number of it.
If you want to startup with the oc applied just click on "Apply overclocking at system startup" and make sure the green button left on that lights up in green.
Attachments
-
 base.jpg68.3 KB · Views: 21,239
 -
 settings.jpg11.2 KB · Views: 117,500
 -
 monitoring.jpg25.5 KB · Views: 117,966
 -
 osd.jpg58.7 KB · Views: 124,988
 -
 toggle.jpg82.3 KB · Views: 1,701
 -
 riva.jpg135.6 KB · Views: 1,549
 -
 stone.jpg74.1 KB · Views: 1,506
 -
 fan.jpg14.1 KB · Views: 117,450
 -
 fan G.jpg76.5 KB · Views: 1,267
 -
 K.jpg6.9 KB · Views: 117,676
 -
 Komb.jpg81.6 KB · Views: 1,217
 -
 clocks.jpg14.8 KB · Views: 117,163
 -
 volt.jpg7.6 KB · Views: 117,186
 -
 volta.jpg47 KB · Views: 119,518
 -
 mv.jpg9.3 KB · Views: 116,943
 -
 trip.jpg19.7 KB · Views: 117,406
 -
 se.jpg93.6 KB · Views: 1,790
 -
 limit.jpg7.7 KB · Views: 117,000
 -
 leg.jpg85.1 KB · Views: 119,883
 -
 skin.jpg75.5 KB · Views: 1,309
 -
 limthere.jpg74.8 KB · Views: 117,066
 -
 Temp.jpg14.7 KB · Views: 116,685
 -
 temp2-1.jpg8 KB · Views: 116,412
 -
 prof.jpg8.4 KB · Views: 116,482
 -
 APP.jpg18.3 KB · Views: 116,529
Last edited by a moderator:

 ):
):